Introduction to Zombie Cheerleader Makeup
As Halloween approaches, many people are in search of unique and exciting costume ideas. Among the various options, the zombie cheerleader makeup look stands out as a creative blend of fun and fright. This playful yet spooky concept allows individuals to express their creativity while getting into the Halloween spirit. If you are considering this look for an upcoming Halloween party or event, you’ve come to the right place.

In this article, we will provide a detailed guide on how to achieve stunning zombie cheerleader makeup. Additionally, we will discuss the necessary products, application techniques, and creative ideas to enhance your overall appearance. By the end of this guide, you’ll be equipped with the knowledge needed to transform into a chillingly cute zombie cheerleader that will turn heads at any Halloween gathering.
Necessary Products for Zombie Cheerleader Makeup
Before diving into the application process, it’s crucial to gather the right products. The right makeup supplies will ensure that your zombie cheerleader look is both impressive and durable throughout your festivities. Here’s a list of essential items you’ll need:
- Foundation: Use a foundation or face paint that is lighter than your natural skin tone. This will create a ghostly base that is characteristic of zombie looks.
- Black and Gray Face Paint: These colors are essential for adding dimension to your makeup. They will help you create sunken cheeks and an overall undead appearance.
- Eye Makeup: Stock up on dark eyeshadow shades such as black, deep purple, and gray. You’ll also need eyeliner, mascara, and potentially false eyelashes to dramatize your eyes.
- Lipstick: Choose a deep red, black, or dark purple lipstick for a bold lip look. It’s essential to create a slightly ragged appearance, which can be achieved with smudging.
- Hair Products: Depending on your hairstyle, you may want hair gel, spray, and possibly a wig to achieve the traditional cheerleader look.
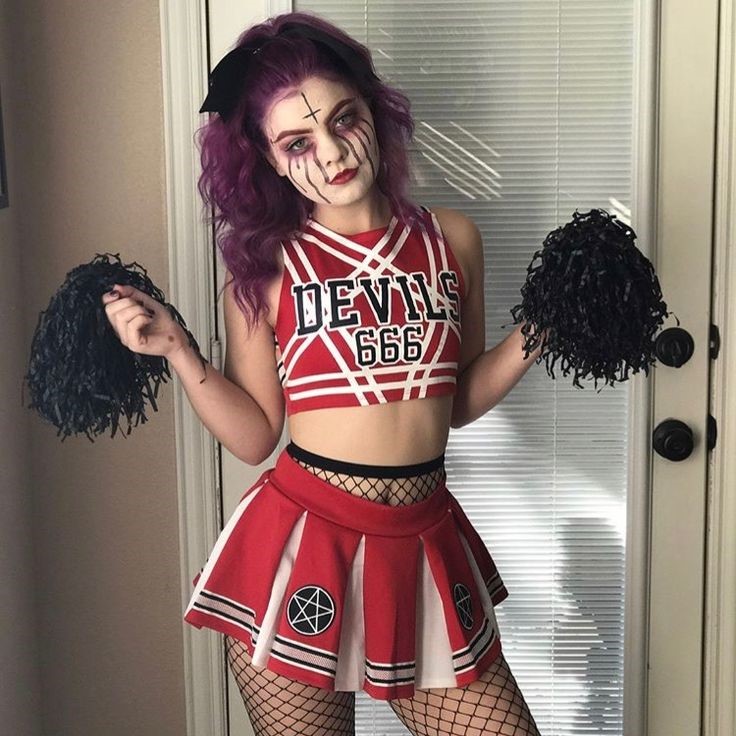
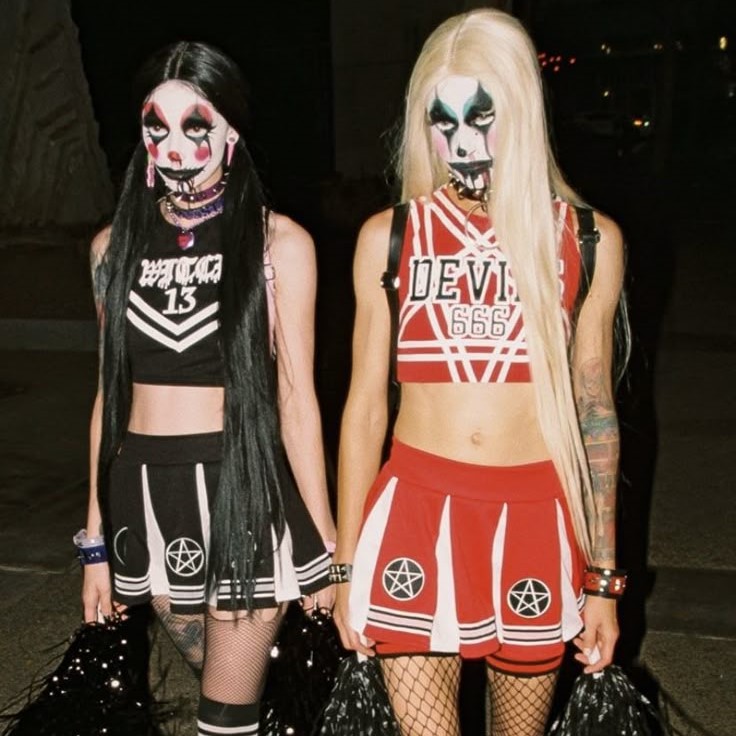
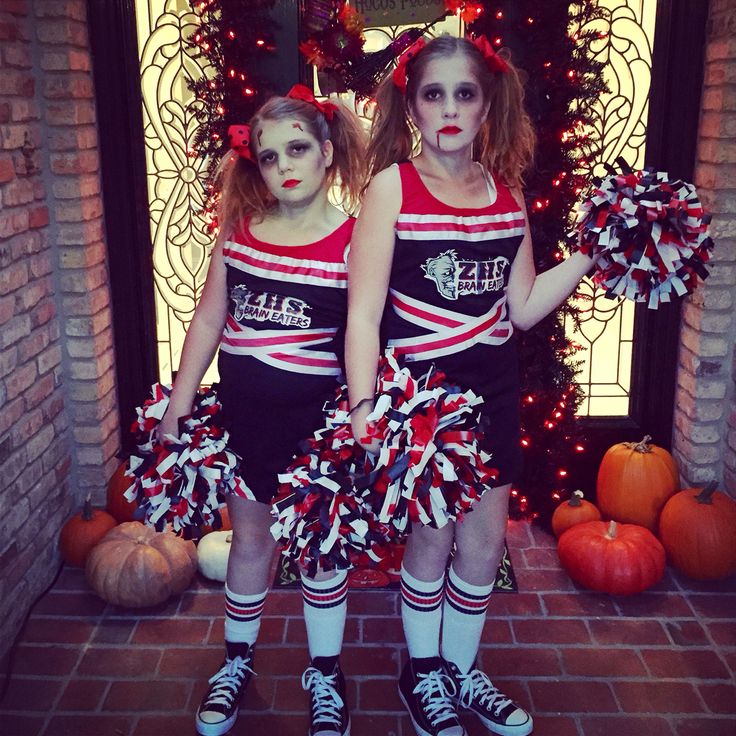
- Extras: Consider incorporating fake blood, glitter, or other special effects makeup to add an extra dimension to your zombie cheerleader costume. Accessories like pom-poms or hair bows can complete the look.
Having all these products at hand will streamline the application process and ensure your makeup experience is enjoyable.
Preparing Your Skin for Zombie Cheerleader Makeup
Preparation is key when applying any makeup, and especially when it comes to achieving an elaborate look like a zombie cheerleader. Here are some steps to consider for prepping your skin:
Cleanse Your Face
- Begin with Freshly Washed Skin: Cleansing your face is an essential first step in any makeup routine. Start with clean skin to ensure that your makeup application goes smoothly. This prepares your skin for the subsequent products, allowing for better adherence and a more polished look.
- Choose Your Favorite Cleanser: Select a cleanser that suits your skin type—whether it’s gel-based, cream, or oil-based. Ensure it effectively removes dirt, oil, and leftover makeup. Gently massage the cleanser into your skin in a circular motion to break down impurities, and then rinse thoroughly with lukewarm water.
- Importance of Removing Residual Makeup: Paying special attention to areas where makeup tends to linger, such as around the eyes and along the jawline, is crucial. Residual oils and makeup remnants can create a barrier, preventing the makeup from adhering properly, which could lead to a patchy finish.
- Pat Dry with a Clean Towel: After rinsing, gently pat your face dry with a clean towel. Avoid rubbing, as this can irritate your skin. A gentle pat ensures your skin remains calm, reducing any redness that could affect your makeup application.
Moisturize
- Apply a Lightweight Moisturizer: Once your skin is clean, apply a lightweight moisturizer to keep your skin hydrated. This step is vital for maintaining skin health and ensuring your makeup looks its best throughout the day or evening.
- Consider Your Skin Type: Choose a moisturizer suitable for your skin type. For oily skin, opt for an oil-free or gel-based moisturizer, while those with dry skin may benefit from a creamier formula. Proper hydration is essential, especially if you plan on using heavy face paints that can dry out your skin.
- Let the Moisturizer Absorb: After applying your moisturizer, allow it a few minutes to absorb into your skin. This will create a hydrated base that helps makeup glide on smoothly without emphasizing dry patches or flakiness.
Apply a Primer
- Select a Quality Primer: Applying a good-quality primer before foundation application can significantly impact the longevity of your makeup. Choose a primer that suits your skin concerns; for example, a mattifying primer for oily skin or a hydrating primer for dry skin.
- Benefits of Using Primer: A primer serves multiple purposes: it creates a smooth canvas for foundation, helps fill in pores, and can even out skin texture. This leads to a more flawless makeup application and helps your foundation adhere better to your skin.
- Application Technique: Use your fingers or a makeup sponge to apply a small amount of primer evenly across your face. Focus on areas prone to oiliness or where your makeup tends to fade first, like the T-zone.
Set Up Your Workspace
- Find a Well-Lit Area: Setting up in a well-lit location is crucial for even makeup application. Natural light is ideal, but if that’s not possible, opt for bright, white artificial lighting. Good lighting will help you see the true colors of your makeup and avoid unintentional patches or streaks.
- Organize Your Products: Arrange all your makeup products and tools within reach before you begin. Having everything organized will streamline the application process and reduce frustrations mid-application, allowing for a more enjoyable experience.
- Prepare Essential Tools: Gather necessary tools such as brushes, sponges, and a mirror. Having these tools handy not only makes the process easier but also ensures you’re ready to create a flawless look without unnecessary interruptions.
- Create an Inspiration Board: If you’re aiming for a specific look, consider putting together an inspiration board or having reference images nearby. This can help guide your application, ensuring that you stay aligned with your vision for the final outcome.
Proper skin preparation not only enhances the look but ensures that your zombie cheerleader makeup lasts throughout your adventure.
Step-by-Step Guide to Applying Zombie Cheerleader Makeup
Now that you’ve prepared your skin and gathered your supplies, it’s time to apply your zombie cheerleader makeup! Follow these steps for a captivating transformation:
- Start with Foundation: Use a foundation or face paint that is lighter than your natural skin tone to create a pale base. Apply it evenly all over your face, blending it into the neck area for a uniform look.
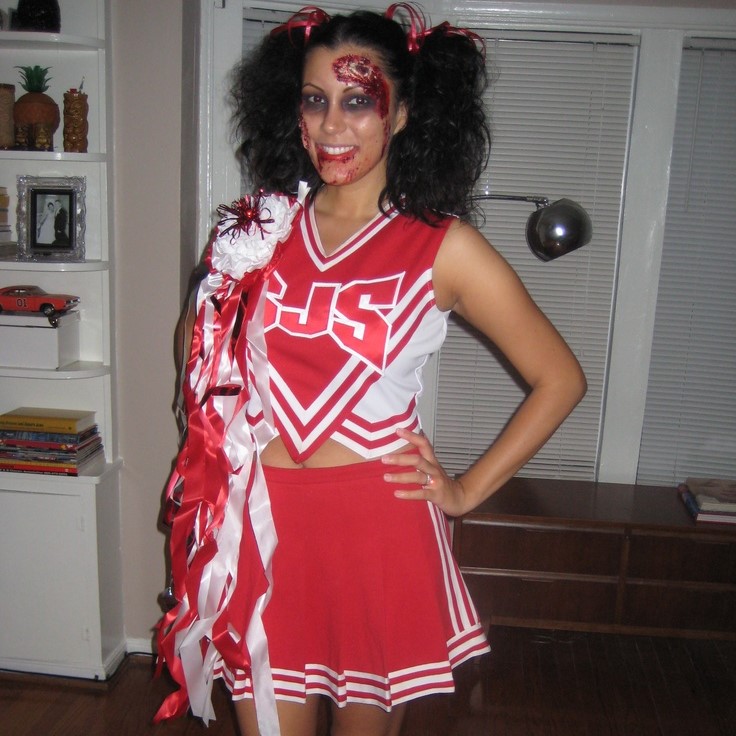
- Contouring for an Undead Appearance: Use black or gray face paint to contour your cheeks, temples, and jawline. This technique will add depth and create the illusion of hollowness typical of a zombie. Make sure to blend well to avoid harsh lines.
- Focusing on the Eyes: Apply a bright white base to your eyelids. Then, use the dark eyeshadow on your lid and blend outward for a smoky effect. Smudge eyeliner around your lower lash line, and finish with several coats of mascara. If desired, apply false lashes for added drama.
- Create the Lip Effect: Line your lips with dark lip liner and fill in with deep lipstick. Smudge the edges slightly to give a worn, undead look. For an extra touch, add a layer of gloss or fake blood in the center for a gory effect.
- Hair Styling: Style your hair to fit the cheerleader theme. If you have a wig, make sure it is securely in place, and consider teasing it to add volume. Add accessories like hair bows or ribbons for a playful touch.
- Add Final Touches: Now that your face and hair are done, examine your whole look. Make any adjustments and add extras, such as faux blood stains or accessories, to complete your costume.
Following these steps carefully will help ensure that your zombie cheerleader makeup is not only eye-catching but also fits within the theme of your costume.
Tips for Making Zombie Cheerleader Makeup Last
While applying your makeup skillfully is important, ensuring it lasts throughout the festivities is equally vital. Here are tips to help maintain your look:
- Use Setting Spray: A high-quality setting spray will lock in your makeup. After finishing your application, spray it evenly over your face and allow it to dry.
- Carry Touch-Up Supplies: Bring along a small makeup kit with essentials like lipstick, powder, and a compact mirror for quick refreshes. This way, you can address any fading or smudging during the night.
- Avoid Touching Your Face: Try to minimize contact with your face, as oils from your hands can disturb your makeup. Remind yourself to avoid resting your face on your hands, especially while enjoying snacks or drinks.
- Be Mindful of the Environment: If you are participating in outdoor activities, ensure you are prepared for changes in weather. Humidity and heat can affect your makeup.
- Choose Durable Makeup Products: Select long-wear or waterproof products wherever possible. These can withstand sweat and activity, keeping your look intact throughout the night.
By utilizing these tips, you’ll keep your zombie cheerleader makeup looking flawless, allowing you to enjoy Halloween festivities without worry.
Creative Ideas to Elevate Your Zombie Cheerleader Costume
While the zombie cheerleader makeup is sensational on its own, there are plenty of creative ways to enhance the overall costume. Consider these ideas:
- Customize Your Cheerleader Uniform: Use fabric paint to create faux blood splatters or distress your uniform to give it a well-worn appearance. Incorporate character-based elements like sports team logos for added personality.
- Incorporate Unique Accessories: Carrying creative props can turn heads! Consider using spooky pom-poms or themed props like a fake trophy to complement your cheerleader persona.
- Add a Personal Touch: Personalizing the costume elements allows for a more unique flair. Incorporate patches, embellishments, or items that represent your favorite cheerleading team in a fun, spooky way.
- Enlist Friends: Transforming a group of friends into a zombie cheerleader squad adds a dynamic element to your Halloween. Collaborate with friends to design matching costumes for a cohesive look.
- Use Special Effects Makeup: Going beyond the typical zombie look, consider additional effects like scars, burns, or other injury-themed designs on exposed skin. This artistry heightens the spooky factor while making your costume even more striking.
By thinking outside the box and adding these creative enhancements, you’ll captivate everyone with your unique interpretation of the zombie cheerleader theme.
Conclusion: Transforming into a Zombie Cheerleader
In conclusion, achieving a stunning zombie cheerleader makeup look is an exciting way to express creativity this Halloween. With the right products, techniques, and a touch of personal flair, you will transform into a captivating character that embodies both spookiness and style.
Whether you’re attending a party or participating in Halloween festivities, applying these creative techniques will ensure your look is impressive and unique. Embrace your inner cheerleader with a chilling twist and have fun with the transformation.
Remember, the key to success lies in preparation, practice, and attention to detail. By stepping into your role as a zombie cheerleader, you will undoubtedly leave a memorable impression on everyone you encounter. So gather your supplies, follow these guidelines, and enjoy the spooky season!